Posts Tagged ‘stamped’

Greetings!

Wednesday, December 15th, 2010

Are you ready for the holidays? The house is decorated, I’ve gotten all my gifts bought and wrapped, and my cards made and mailed, I think I’m ready! I wanted to share a few of my holiday cards with you today.

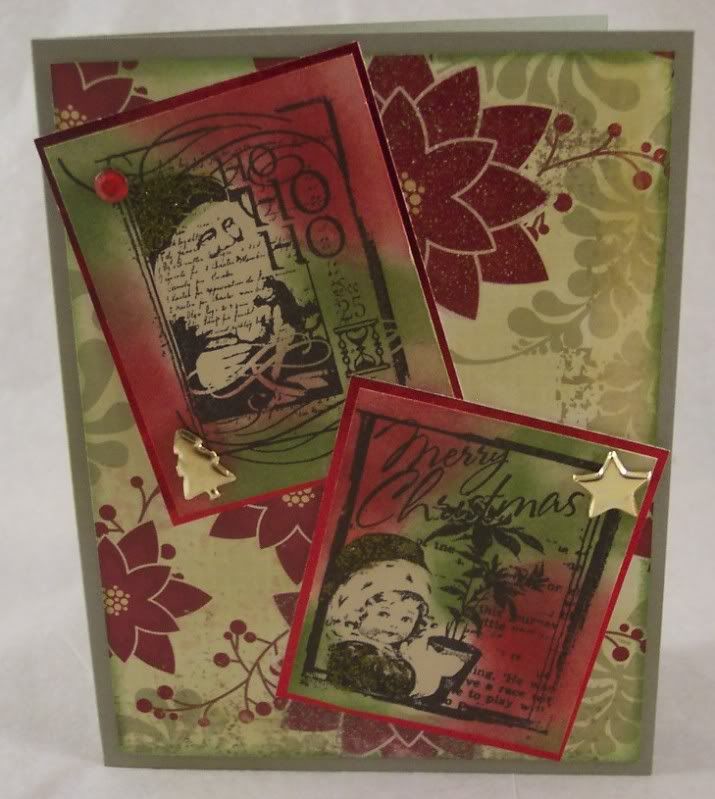
This first one was inspired by Tim Holtz (I love his 12 Tags of Christmas each year!) I stamped the image (from Recollections) with black Staz-On ink and then took cosmetic sponges to rub the red and green inks over the images, blending as I went. I added some sparkle with Tim’s Distressed Stickles too.
Photobucket

This next one I stamped the snow globe and snowman (from Inkadinkado) on vellum and colored on the backside of the vellum with colored pencils, it gives it a nice soft look.
Photobucket

This cute little scene was put together from stamps from a few different companies, the deer is Colorbox, the snowflakes and text from Inkdinkado, the tree and bird from Close To My Heart. The deer was kinda of plain so I used a black marker to add his eyes and spots, it helped give him more dimension. The berries on the tree were made with the blunt end of a red marker and I added Stickles to the branches and on the ground around the tree and deer for lots of sparkle.
Photobucket

I hope you all have a wonderful holiday season!!
-Heather

Halloween Rosette Card

Thursday, October 14th, 2010

I’m not really sure what the official term for these accordion folded paper embellishments are that are popping up all over on cards and scrapbook pages but I’ll go with rosette 🙂 They make a cool dimensional addition to any card or scrapbook page, you could also glue two back to back with a ribbon hanger and make a fun ornament.

Photobucket

Here’s what you need:
one 1 1/2″ x 11 1/2″ strip of patterned paper
two 1 1/2″ punched cardstock circles
strong adhesive (I used red line tape)
scoring board with bone folder ( I used my Martha Stewart board)

Start by scoring your patterned paper every 1/2″:

Photobucket

and then accordion fold it back and forth:

Photobucket

using a strong adhesive tape the two ends of your patterned paper to form a circle:

Photobucket

gather the circle, pinching the top and push downwards to flatten it out:

Photobucket

Photobucket

on the back side adhere one circle with strong adhesive:

Photobucket

on the front adhere the other circle and any other layers you might want to add to decorate the front:

Photobucket

I also added a fun retro looking cat stamp on my circle layers.

Here’s what it looks like from the side:

Photobucket

depending on what papers and stamps you use these can be made for any occasion.

The cat stamp I used is from PSX, all others are from Close To My Heart.

His name is Flower

Tuesday, May 18th, 2010

Oh my gosh, has it really been that long since my last post?! Spring time is just so busy, I’ve been doing so much yard work, planting, weeding, mowing, etc. it’s taken up alot of my free time. I’ll try to do better 🙂

I haven’t posted any cards or stamping lately so I wanted to share a fun card I made for a class recently. They loved it, especially the flower and I wanted to share how I made it.

Photobucket

First off you need a large brad and some ribbon that has stitching through it, it comes in lots of colors and can be found at most craft stores. Cut a 5″ piece of ribbon and begin pulling the threads from the *same* long side on both ends. Keep pulling and gathering the ribbon as you go, when it forms a circle tie the ends of the ribbon threads together, then trim off the ends of the threads, careful not to cut through the knot. Then insert a large brad through the ribbon flowers open center and open up the brad, this will hold it in place and you can use a large glue dot to hold the flower to your project. Easy and cute, huh?

Photobucket

The skunk and sentiment stamp comes from a set from The Paper Company and he’s been embossed in black, the bottom of the card has been cut with a scalloped pair of decorative scissors.

Forest Fairytale

Friday, March 20th, 2009

I recently got a super cute stamp set of forest animals and made some Artist Trading cards with them. I layered brown and black cardstock and then added a layer cut from a vintage children’s story book and stamped tiny stars on the book paper. Then I stamped the images, cut them out and mounted them with foam tape and then added Tim Holts’ distress Stickles glitter glue to each image. It adds a nice bit of color and chunky glitter but it’s more of an aged glitter look like German glass glitter than more traditional “sparkly” glitters, it’s really fun to use. Just a note I find it takes quite awhile to dry though so keep that in mind when using it.

“Sing” The first one is a deer in the forest, I stamped a tree trunk onto a scalloped I die cut and added a cute bluebird in the tree.

Photobucket

 “Frog Prince” This next one is an adorable frog, I added a big gold crown to him. I stamped the crown on a thin metal gold sheet and then embossed it with a stylus tool then cut it out.

Photobucket

“Whoo?” The last one is an owl, he’s sitting on a stamped branch with cut out paper leaves.

Photobucket